Bread Dough Mixers
Nothing compares to the kneading and mixing performed by a quality mixer. And even though there are some recipes that I enjoy kneading by hand, using a bread mixer saves you time and spares you the sore arms and hands! A bread mixer allows you to knead large amounts of dough - some up to 19 lbs - in one shot. And because of how it's used, you will be better at gauging the amount of flour needed and not add too much flour, which happens quite often when kneading bread dough by hand.
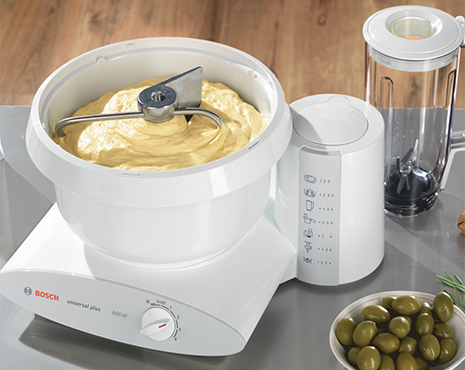
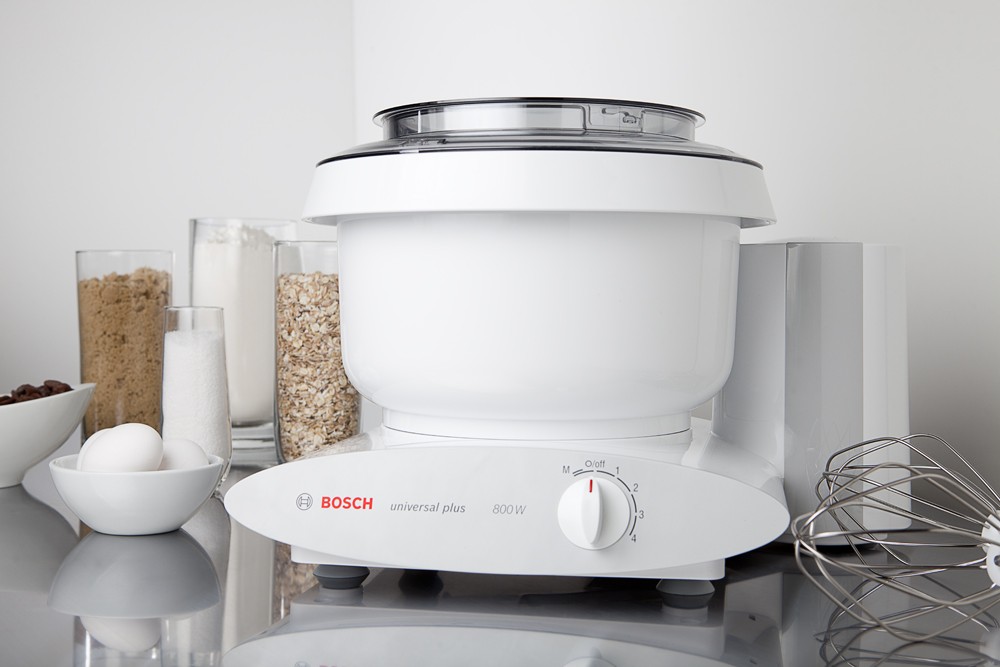
There are several mixers on the market to choose from. Many people are pleased with the Kitchen Aid, but my experience using this mixer for bread dough kneading was not the best. Even their largest model did not have a big enough bowl. If you're serious about bread baking and are looking for a powerful mixer for bread kneading, you can't go wrong with the Bosch Universal Mixer.
Another mixer I've also used is the Mix N Blend II Blender and Food Mixer. In fact, I used it for about 8 years until I switched to the Bosch. The touchpad controls and easy-to-read display make it simple to navigate the many available options. It will also knead your bread dough (up to 12 lbs) until the gluten is fully developed and will then automatically shut off.
They are both great mixers with many of the same features, but I still prefer the Bosch Universal Mixer. Its superior kneading action, strong motor, large mixing bowl, stable weight, beautiful design, durable nonplastic parts, and german quality will not disappoint. Here's a video where the Bosch is compared to other mixers on the market:
Wheat Grinders
Nothing beats the aroma of bread baked with freshly ground whole wheat flour. I've baked with both store-bought and freshly ground, and there's a certain freshness, brightness, sweetness, and less of a bitterness that store-bought whole wheat flour cannot beat. But aside from attaining a whole wheat flour that tastes better, here are other reasons I like to grind my own wheat:
- I want it to be fresh - As we all know, fresher is better, right? Store-bought whole wheat flour is definitely not milled the day you buy it. I like the idea of being able to grind the amount of wheat that I need for the day and use it right away. All the nutrients are still there, ready to nourish my body, and nothing has been lost in the process. I am also in control of the type of wheat that I want to use (red or white), or use a mix of the two if I want to.
- I save money - Buying your wheat kernels in bulk and grinding them yourself will save you money. Did you know that you can spend as little as 0.50 cents on a loaf of bread when making it yourself? That's a great incentive for me to continue to grind my wheat and save my extra money for--who knows--another pair of shoes!
- I can grind other grains - Depending on the model you choose to invest in, some wheat grinders can grind other non-oily grains such as oats, rice, triticale, kamut, spelt, buckwheat, barley, rye, millet, teff, quinoa, amaranth, sorghum and dent (field) corn. You can also grind spices, lentils and dry beans (pinto, red, garbanzo, kidney, etc.) Truth be told, I've only used my wheat grinder for wheat so far, but having the versatility to grind other grains leaves room for more experimenting and awesome baking.

The grain mill I currently use is the NutriMill Classic 760200 High-Speed Grain Mill. It has a 20-cup capacity, the ability to maintain more nutrients (its multi-channel airflow keeps the motor cool), and grind non-oily grains with precision. I also like how you can the change the speed from Low to High with a simple knob turn (I always keep mine on high for wheat grinding) and a larger knob to go from Fine to Coarse (I always keep my knob with the arrow at 1 o clock, which gives me the best flour coarseness for whole wheat bread baking.)
I realize that buying a wheat grinder is a HUGE investment, especially for many young families. If you don't currently have the budget for buying a wheat grinder, buying store-bought whole wheat flour is still a great option. Don't get caught up in the idea that baking bread at home with store-bought whole wheat flour is not worth the effort. Think about it this way--purchasing whole wheat bread at the store is a good option, but baking bread at home using purchased whole wheat flour is a better option. Grinding your own wheat would ultimately be your best option, but hey, baby steps for now, right? You're on your way to feeding healthier bread to your family and I couldn't be more thrilled!
Bread Baking Pans
Glass? Metal? Nonstick? Plenty of options available, and as expected, some work better than others--it all depends on what's important to you. After trying different kinds of bread pans through the years, I've stuck with the Norpro 8 inch nonstick bread baking pan. They are simply the best! They are narrow and tall, as opposed to wide and short.

"Why does that matter?" you may ask. Well, it matters because these pans will give you a better-looking loaf, not one that is flat and pathetic (I'm being a bit dramatic now, but it's the truth!) If you're a perfectionist like me, you want your loaves to look high and narrow to attain the desired "mushroom" look. They not only have to taste amazing (and they do--just try one of my recipes!), they also have to look good!
These pans also have a textured, waffle-type inside. Because it isn't smooth, your bread loaves will basically fall out of the pan! It's almost effortless.
I make 5 loaves of bread a week. These pans are by far my favorite. They make a beautiful medium sized loaf. They brown the bread beautifully and evenly. They may seem rather pricey compared to what you might catch on sale at a discount store, but don't bother with the other types. Make the investment--you will be happy you did.
Kitchen Scales
Having a kitchen scale is a must--especially for the perfectionist baker. Sure, you could eyeball it and split the dough into 5 parts that look kind of the same, but looks can be deceiving. I normally weigh my whole dough first (its weight varies slightly every time) and divide the number by 5. This way I can distribute the dough evenly among all 5 loaves.
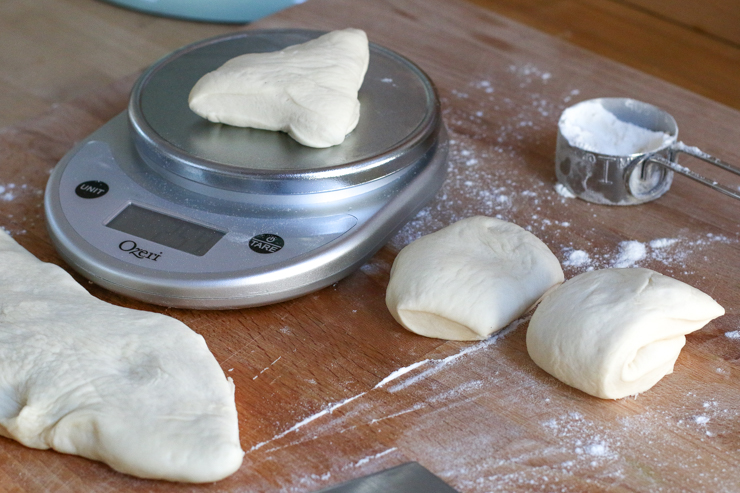
There are many different kinds of kitchen scales to choose from. Just make sure you get one that can handle 10-12 lbs of weight. Some come with an attached bowl, but I prefer one with a flat surface, like the Ozeri Pronto Digital Multifunction Kitchen and Food Scale. It's accurate, easy to use, and it comes with an enlarged weighing platform. Also, you can put a plate on it and the scale will automatically subtract the weight of your bowl or container. Super easy!
Dough Cutters
When I first started baking I didn't think having a dough cutter would be necessary, and in a way, it's true. You could section out your dough by using your hands or with any sharp knife. But once you use a dough cutter, there is no turning back! Dough cutters don't pull on the dough, giving you a clean cut without squishing the dough. You have to try it to know what I'm talking about! I lay my bread dough on a cutting board or butcher block surface and split it into however many sections I need. Then I weigh each portion to even the weight among all the portions.
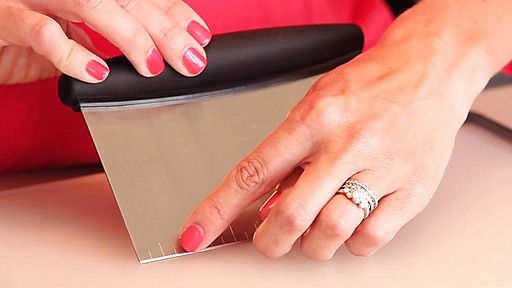
My favorite brand is OXO Good Grips Multipurpose Stainless Steel Scraper & Chopper. It also serves as a bread dough scraper which is quite helpful. Its comfortable non-slip rubber handle is great for absorbing pressure. I also like the measurements that are on the cutter--it really helps to measure the size of rolls, croissants, or flatbreads.
Silicone Mats
When working with 100% whole wheat bread dough, it's always important to oil your work surface, otherwise, your dough will stick to the counter and make a humongous mess. Oiling a countertop means you have to deal with the clean-up afterwards, which can be pretty tedious as well. All of this can be avoided by placing a silicone mat where you'll be kneading and sectioning your dough.
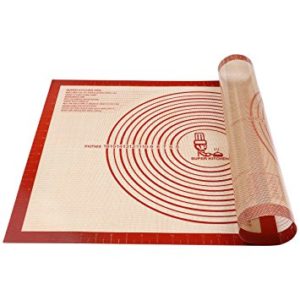
Clean-up will be a snap if you give these mats a try. They stick to your surface nicely--the edges won't curl up at all. I like to use them when I bake cookies and other pastries to avoid using a nonstick spray.
My favorite one is the Super Kitchen Non-slip Silicone Pastry Mat Extra Large Counter Mat. It's oversized and perfect to lay on your counter. I also love how it comes with all the measurements to roll out pie crust. So if you bake pies, you'll love having this handy guide to roll out a perfect circle and achieve the right size.
So there you have it--my favorite tools for perfect bread baking. As I continue to explore the world of wheat and other grains, I'll keep you in the loop. My goal is to continue to try yummy recipes and share them as I go--even some for people with gluten sensitivities. Cool, right?
Do you have a favorite bread baking kitchen tool and/or equipment? Do you already own some of the accessories or equipment that I talked about? Tell me down below in the comments section. Don't be shy!
Happy baking!
Beverly